
This bubble tea crochet cat bed is a spin off my Bubblegum Cat Bed. Is it weird that I’m now jealous of my cats because they get to sleep in this freaking adorable crochet cat bed? Of course, they haven’t actually slept in it yet, because that would be too easy, but they have the option okay! Hmm I wonder if they make giant bubble tea shaped bean bags for adults?
I made my bubble tea crochet cat bed in the color purple because taro is my favorite flavor, but I think it would also look cute in strawberry pink or matcha green. I’d love to see what color you choose for your version of the bubble tea crochet cat bed – so make sure you tag me if you make one! @nineinspired on IG & Tiktok and @nineinspiredblog on Pinterest and Facebook

Scroll down to check out the free written pattern for the crochet cat bed as well as the Youtube video tutorial. If you want to go ad free and support the blog, there is also a PDF option available in my Etsy and Ravelry stores.
Save This Pattern For Later
Purchase an Ad-Free Printable PDF
Crochet Cat Bed Pattern

Materials
- Lion Brand Basic Stitch & Big Twist Living Yarns (Worsted Weight #4)
- 4 mm Crochet Hook
- Stuffing
- Embroidery Needle
Abbreviations – US Terminology
- ch = chain
- st = stitch
- sl st = slip stitch
- sc = single crochet
- hdc = half double crochet
- dc = double crochet
Crochet Cat Bed Finished Measurements
One Puff: 2.5” x 2.5” (6.5 x 6.5 cm)
Finished Bed: 18.5” x 19” (47 x 48 cm) not including straw
Yardage
Purple: 300 yards (274 meters)
White: 240 yards (219 meters)
Black: 100 yards (91 meters)
Notes
- Pattern is worked in continuous rounds. Don’t join at the end of a round, just keep going. Use a stitch marker to keep track of your rounds if needed.
- Video time stamps are provided in the pattern for specific parts.
Puff Bottom (Make 20 with purple) [0:22]
Start with a magic circle, or ch 2 and work into the 2nd ch from the hook.
Round 1: hdc 10 (10)
Round 2: 2 hdc in each st around. (20)
Round 3: in back loops only, *hdc in the next st, dc in the next st, (2 dc, ch 2, 2 dc) in the next st, dc in the next st, hdc in the next st, repeat from * 3 more times.
Now working through both loops, sc in the next st, sl st in the next st, fasten off and weave in ends.
Bubble Tops (Make 20 with black) & Assembly [4:07]
Start with a magic circle, or ch 2 and work into the 2nd ch from the hook.
Round 1: hdc 10 (10)
Round 2: 2 hdc in each st around. (20)
Rounds 3-4: hdc in each st around. Fasten off, leaving a long tail for sewing.
Use the long tails of your bubble tops to sew them to your purple puff bottoms, working through the front loops that we left available on round 3.
When you have sewn most of the way around, stuff the puff firmly, and then sew it the rest of the way shut.
Flat Squares (Make 25 with purple, 25 with white) & Assembly [8:58]
Repeat the instructions for the puff bottom, except work through both loops on round 3.
For 10 of the purple and 14 of the white: Assemble in pairs, holding two of the pieces together so that the right sides are facing out. Sl st around working through both layers. When you have worked most of the way around, stuff the puff firmly, and then sl st it the rest of the way shut. The unpaired pieces will become the walls of the cat bed.
Crochet Cat Bed Layout [11:46]
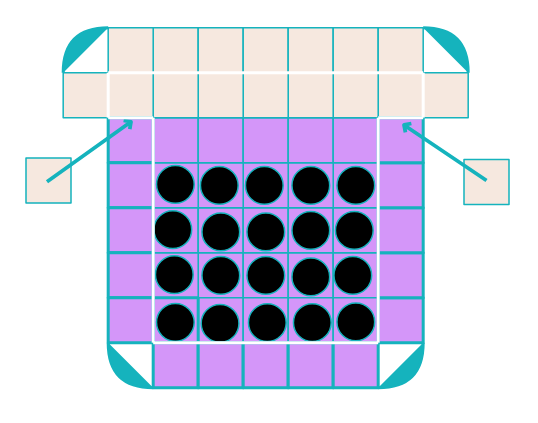
Lay out your completed puffs as shown. The white outline represents where the base of the cat bed will transition into the walls of the cat bed. The semi circles show where you will need to fold the puffs up at the corners so you can join them together along the indicated sides.
[13:41] The ends of the lid (the second row where the squares stick out) will fold up like this:

And then the white squares and purple squares connected by arrows will be sewn together along the one side. [14:22]
Here’s how to join the puffs together. Hold two puffs so that the tops of the puffs are facing inwards. Working through the front loops of the puff closest to you and the back loops of the puff furthest from you, sl st across.
Continue to join puffs in this manner until everything is connected. You can do it all in one go if you follow the continuous join method, or fasten off after each row of puffs is joined – whichever you prefer!
Finishing [14:58]
Attach your purple yarn on the left edge of the cat bed where the purple squares meet the white squares. Ch 1 and hdc to the opposite side, switch to white yarn [15:42] and drop the purple yarn (do not fasten off) to finish the round of half double crochet stitches, sl st to join to the first hdc, turn your work. [16:29] Hdc around 9 more times for a total of 10 rounds.
Now we’re going to join this piece to the first sl st ridge on the underside of the bed. [17:14] Lightly stuffing as you go, sl st all the way around, working through both that first ridge and the 10th row until they’re completely joined.
Crochet Cat Bed Straw [18:42]
With purple or color of choice
Round 1: Ch 40, do not twist or sl st, hdc in the first ch you made and the remaining 39 chs. Continue to work in continuous rounds for a total of 16 rounds. Fasten off and leave a long tail for sewing. Tuck half of the tube inside of itself. [19:45] The folded edge will be the top of the straw. Sew the opposite edge to the top of the cat bed using the yarn tail. [20:08]
Love this pattern? You might like these other crochet patterns:
Copyright © 2019-2024 Nine Inspired. All rights reserved. Please do not redistribute this pattern as your own, but feel free to sell finished items made from this pattern. I would appreciate it if you would credit Nine Inspired as the designer.