
I tried to google whether Lightbulb should be one word or two, but it seems that the matter is undecided! Some dictionaries say that it should be two words, while others say that it should be one word. No matter how you decide to say light bulb, you are sure to love my new keychain design!
This keychain was designed for the Back to School Blog Hop hosted by Creative Snugglies. I hope that this keychain will inspire lots of lightbulb moments for your kiddos in the upcoming school year. Do be sure and check out the rest of the free keychain crochet patterns in the blog hop too for more back to school inspiration!
Disclaimer: This page may contain affiliate links. I get a small commission for purchases made through affiliate links – at no cost to you. Thank you for your support.

Keychains are addictively quick to make and they require very small amounts of yarn, so feel free to dip into your scraps basket for this project! The Lightbulb Keychain is a free and easy tunisian crochet pattern that uses basic tunisian crochet stitches. I’ve included helpful photos every step of the way so you don’t get stuck!
When you’re done with the base shape of the lightbulb, you’ll make another one to match and then sandwich the two together. Finish it off with some embroidery and you’re done! There are two design options for the embroidery: a traditional lightbulb filament shape or a heart shaped one.

Save This Pattern For Later!
Add it to your Ravelry queue HERE.
Save this pattern to your Pinterest HERE.
Or Bookmark this page!
Or Get Started On This Free Crochet Keychain Pattern Right Now!
Materials
Worsted, size 4, medium yarn
(samples are shown in Paintbox Cotton Aran)
5 mm hook
Skill Level
Easy
Finished Measurements
3” Long x 2.5” Wide (8 x 6 cm)
Yardage
20 yards main color (18 meters)
2 yards accent color (2 meters)
Abbreviations
US Terminology
ch = chain
st = stitch
sc = single crochet
tss = tunisian simple stitch
tks = tunisian knit stitch
tes = tunisian edge stitch
tfs = tunisian full stitch
rtn = return
Notes
Make sure to work the last stitch of every row through 2 vertical bars for a clean edge. I will refer to this final stitch as the tunisian edge stitch (tes) in the pattern to remind you.
To bind off: *pull up a loop in the next vertical bar as you would a tss, yarn over and pull through 2 loops* repeat the starred section the number of times indicated.
Lightbulb Motif (make 2)
Base
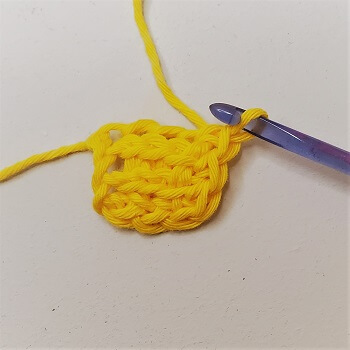
Row 1: Ch 4, pull up a loop in the 2nd ch from the hook and each ch across (4 loops on hook.) Rtn: ch 1, *yarn over and pull through 2 loops* repeat the starred section across until 1 loop remains.
Rows 2-3: tks 2, tes, rtn.

Bind off 3. Rotate your work one quarter turn clockwise.
Bulb
Row 1: Ch 1, pull up a loop in the next 4 tes and in the first ch of your starting chain (6 loops on hook) rtn.
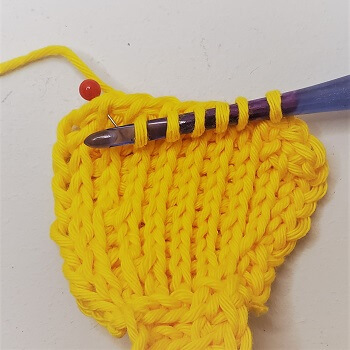
Row 2: tfs between the 1st and 2nd vertical bars, tks 4, tfs between the 5th vertical bar and the edge stitch, tes, (8 loops on hook) rtn.
Reference the image for the proper placement of the tfs stitches.

Rows 3-4: tks 6, tes, rtn.
Row 5: tfs between the 1st and 2nd vertical bars, tks 6, tfs between the 7th vertical bar and the edge stitch, tes (10 loops on hook) rtn.
Rows 6-9: tks 8, tes, rtn.
Row 10: Bind off 1. Tks 7, tes, (9 loops on hook) modified rtn: don’t ch 1, *yarn over and pull through 2 loops* repeat the starred section across until 1 loop remains.
Row 11: Bind off 1, tks 5, tes in the little carrot leftover from our modified rtn, (7 loops on hook) then do the same modified rtn.
Reference the image to determine the placement of your edge stitch. See how the two vertical loops come together at the top? Looks like a carrot to me. 🙂
Row 12: Bind off 1, tks 3, tes in the carrot, (5 loops on hook) yarn over and pull through 2, yarn over and pull through 2, yarn over and pull through 3.
Row 13: Bind off 3 working in the carrots.

Cut your yarn and pull the tail through the next edge stitch so there’s no bump. Weave in ends.
Finishing
Embroider your lightbulb details with the color and shape of your choice. Then put your two lightbulb motifs back to back (right sides facing out), attach the same color of yarn as you used for the embroidery and evenly sc around the edge working through both motifs. Attach keychain at the top.

__________________________
Please do not redistribute this pattern as your own, but feel free to sell finished items made from this pattern as long as you credit Nine Inspired as the designer. I would love to see your work on social media! Tag me @nineinspired