
This quick scarf is perfect for a night out on the town in the crisp springtime air. There are no color changes made in the middle of the row and the bulk of the scarf is done in double crochet which makes this a very quick project. You only need two skeins of yarn in contrasting colors. I love Simply Soft yarn because it is soft and affordable!
Here are some features of this scarf:
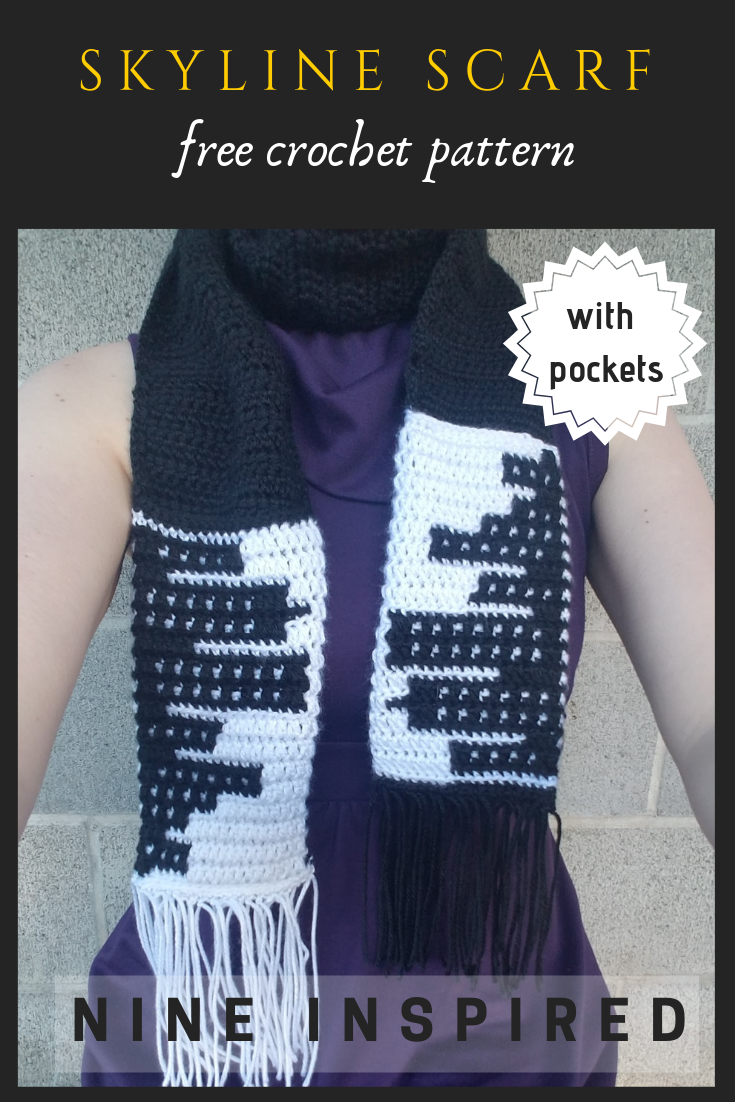
has pockets
has pockets
has pockets
Need I say more?
A PDF printable of this pattern is available in my Love Crafts store for only $1.99 Thank you for your support! Printable Pattern
Let’s get started!
Finished Measurements
58″
Supply List
Caron Simply Soft Black – 1 skein
Caron Simply Soft White – 1 skein
(or any other worsted weight yarn)
Crochet Hook in size H-8, 5 mm
(you might also want a hook one size smaller for weaving in ends)
Abbreviations
US Terminology
ch = chain
st = stitch
sk = skip
sc = single crochet
dc = double crochet
sl st = slip stitch
blo = back loop only
flo = front loop only
Notes
Mosaic Crochet: The skyline pattern is worked in the round using the mosaic crochet technique. In this technique all sc are worked in the blo and all dc are worked in the flo of the stitch 2 rows below. In doing so you will use the same color for the entire round and change colors at the end of each round. This also creates a neat striped pattern on the wrong side of the work and the pockets for the scarf! Here is a great video if you need more information about this amazing technique:
https://www.youtube.com/watch?v=XHdgBFQ0BRg
Color Changes: When you complete the final stitch of the round, you should insert your hook into the first stitch of the round and pull up a loop of the next color of yarn and use that loop to complete your slip stitch.
Reading the Graph: Start by crocheting 40 and sl st to join to the first st being careful not to twist the starting chain. Follow the pattern on the bottow row from right to left using the first color indicated in the row, then sc 20 and sl st to the first st of the round using the color change technique described above to switch to your second color.
***There is also a written pattern for this graph for those who would prefer to read out the stitches. Just scroll down! ***

Written Skyline Section
w = white, b = black
sl st to the starting st at the end of every round using the color change technique described above
ch 40, sl st to first ch without twisting
Row 1: w, sc 40
Row 2: b, sc 18, dc 2 , sc 20
Row 3: w, sc 1, dc 12, sc 27
Row 4: b, sc 13, [dc, sc] x3, dc , sc 20
Row 5: w, sc 1, dc 12, sc 27
Row 6: b, sc 17, dc 3 , sc 20
Row 7: w, sc 1, dc 13, sc 26
Row 8: b, sc 14, dc 2, [sc, dc] x2, sc 20
Row 9: w, sc 1, dc 10, sc 29
Row 10: b, sc 11, [dc, sc,] x4, dc, sc 20
Row 11: w, sc 1, dc 5, sc 34
Row 12: b, sc 6, [dc, sc] x6, dc 2, sc 20
Row 13: w, sc 1, dc 5, sc 34
Row 14: b, sc 16, dc 4, sc 20
Row 15: w, sc 1, dc 10, sc 29
Row 16: b, sc 11, [dc, sc] x4, dc, sc 20
Row 17: w, sc 1, dc 9, sc 30
Row 18: b, sc 17, dc 3, sc 20
Row 19: w, sc 1, dc 2, sc 37
Row 20: b, sc 3, dc 2, [sc, dc] x7, dc, sc 20
Row 21: w, sc 1, dc 2, sc 37
Row 22: b, sc 3, dc 2, [sc, dc] x7, dc, sc 20
Row 23: w, sc 1, dc 2, sc 37
Row 24: b, sc 14, dc 6, sc 20
Row 25: w, sc 1, dc 4, sc 35
Row 26: b, sc5, dc 3, [sc, dc] x6, sc 20
Row 27: w, sc 1, dc 2, sc 37
Row 28: b, sc 5, dc 3, [sc, dc] x6, sc 20
Row 29: w, sc 1, dc 4, sc 35
Row 30: b, sc 17, dc 3, sc 20
Row 31: w, sc 1, dc 8, sc 31
Row 32: b, sc 9, dc 2, [sc, dc] x4, dc, sc 20
Row 33: w, sc 1, dc 8, sc 31
Main Length of Scarf
*don’t break the yarn from the first skyline graph*
b, sc around, sl st to the first st still using the black yarn, ch 3 and turn
*don’t work into the first st that the ch is coming out of, dc in the next 18 stitches, ch 3 and turn* Repeat until desired length is reach, keeping in mind that you will also be attaching a second skyline section to the other end. I did 92 rows.
at the end of your last row ch 1 and sl st evenly up the side of the work, sl st across the top of the pocket made by the skyline section and then sl st evenly back down the other side of the work, break yarn and weave in ends
Second Skyline Section
Complete as the first. Upon completing the last row as normal, fold the round flat so that the skyline faces you, continue with the white yarn and sl st evenly across through both the front where the skyline is and the back where the stripes are. This forms the bottom of your pocket. Break yarn and weave in ends.
Attach white yarn to the open end of the skyline piece and sl st it on to the free end of the main length of the scarf.
Finishing
Close up the pocket on the first skyline section in the same way that you did the second skyline section.
Cut 20 pieces of white yarn about 12 inches in length. Thread each strand through one of the stitches on the bottom of the first skyline piece, pull each side of the strand so that they are even and then double knot.
Cut 20 pieces of black yarn about 12 inches in length. Thread each strand through one of the stitches on the bottom of the second skyline piece, pull each side of the strand so that they are even and then double knot.
Thanks for reading my free pattern! Please do not redistribute this pattern as your own, but feel free to sell finished items made from this pattern as long as you credit Nine Inspired as the designer.
One thought on “Skyline Scarf – FREE Crochet Pattern”
Comments are closed.