
When free pattern Friday falls on October 1st, you know it’s got to be an extra special pattern! This coffin clutch bag is both spooky and cute – perfect for all your October shenanigans. The bag features peek a boo lace with fabric backing, metallic accents for a dash of punk, and a zipper with a wristlet strap.
I used Cascade Yarns Noble Cotton for this one. It’s a mercerized cotton that’s very durable as well as shiny. The pink lavender color was just too cute to pass up. This is seriously like the pastel goth bag of my dreams!
Stitches used are linked double crochet and crossed double crochet. They’re not super tricky, but I wouldn’t call them beginner stitches. Also, the construction of the bag and all the add ons make it a bit more advanced, so I would recommend this pattern for intermediate level crocheters.

Short on time? Save this pattern for later with Pinterest or Ravelry!
Materials
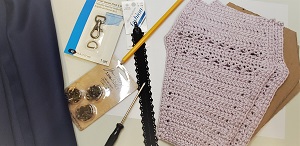
- Cascade Yarns Noble Cotton – Worsted, size 4, medium yarn in the color Pink Lavender
- 4.5 mm hook
- 7” Zipper
- 13 mm Lobster Clasp
- Paper Fasteners aka Brads
- An Awl or a Pointy Screwdriver
- ¼ Yard Fabric for Lining
- Scrap Cardboard
- Sewing Needle & Thread
- Embroidery Needle
Finished Measurements
9 x 6.5 inches
Abbreviations
US Terminology
ch = chain
st(s) = stitch(es)
sc = single crochet
blo = back loops only
dc = double crochet
Special Stitches
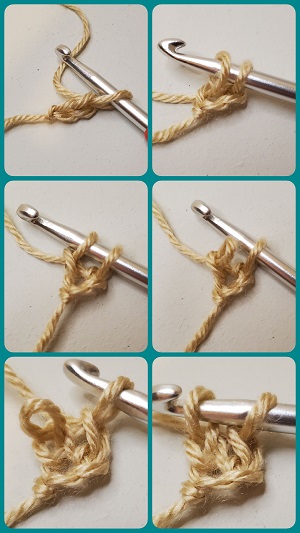
ldc = linked double crochet
To make the first one in a row: pull up a loop in the 2nd ch from the hook, pull up a loop in the 3rd ch from the hook, yarn over and pull through 2 loops, yarn over and pull through 2 loops.
To make subsequent ldc sts: pull up a loop in the horizontal bar of the previous ldc, insert hook into the next stitch and pull up a loop, yarn over and pull through the first 2 loops, yarn over and pull through the final 2 loops.
Panels (Make 2)
Row 1: Ch 15, pull up a loop in the 2nd ch from the hook, pull up a loop in the 3rd ch from the hook, yarn over and pull through 2 loops, yarn over and pull through 2 loops. (first ldc made). Ldc in the next 12 sts. (13)
Row 2: Ch 2, pull up a loop in the 2nd ch from the hook, pull up a loop in the first st of the row, yarn over and pull through 2 loops, yarn over and pull through 2 loops (first ldc made), ldc again in the same st, ldc in the next 12 sts. (14)
Row 3: Ch 2, ldc 2 in the first st, ldc in the next 13 sts. (15)
Row 4: Ch 2, ldc 2 in the first st, ldc in the next 14 sts. (16)
Row 5: Ch 2, ldc 2 in the first st, ldc in the next 15 sts. (17)
Row 6: Ch 2, ldc 2 in the first st, ldc in the next 16 sts. (18)
Row 7: Ch 2, ldc 2 in the first st, ldc in the next 17 sts. (19)
Row 8: Ch 2, ldc 2 in the first st, ldc in the next 18 sts. (20)
Row 9: Ch 2, ldc 2 in the first st, ldc in the next 19 sts. (21)
Row 10: Ch 2, ldc 2 in the first st, ldc in the next 20 sts. (22)
Row 11: Ch 2, ldc 2 in the first st, ldc in the next 21 sts. (23)
Row 12: Ch 2, ldc 2 in the first st, ldc in the next 22 sts. (24)
Row 13: Ch 3, sk the first 2 sts, dc in the next st, ch 1, dc in the first skipped stitch, [sk the next 2 sts, dc in the next st, ch 1, dc in the first skipped stitch] repeat across, dc in the last st. (26)
Row 14: Ch 1, sc 2 in the first st, sc in each st and ch sp across to the last st, sc 2 in the turning ch. (28)
Row 15: Ch 1, sc in the first st and each st across. (28)
Row 16: Ch 1, sc the first 2 sts together, sc across to the last 2 sts, sc the last 2 sts together. (26)
Row 17: Ch 3, sk the first 3 sts, dc in the next st, ch 1, dc in the second skipped stitch, [sk the next 2 sts, dc in the next st, ch 1, dc in the skipped stitch] repeat across to the last 4 sts, sk the next 3 sts, dc in the next st, ch 1, dc in the second skipped stitch, dc in the last st. (24)
Row 18: Ch 2, pull up a loop in the 2nd ch from the hook, pull up a loop in the second st of the row, yarn over and pull through 2 loops, yarn over and pull through 2 loops (this skips the first st and decreases our stitch count by 1), ldc in each st and ch sp across. (23)
Row 19: Ch 2, make your first ldc in the second st of the row, ldc across. (22)
Row 20: Ch 2, make your first ldc in the second st of the row, ldc across. (21)
Row 21: Ch 2, make your first ldc in the second st of the row, ldc across. (20)
Row 22: Ch 2, make your first ldc in the second st of the row, ldc across. (19) Continue without fastening off.

Round 1: Ch 1, evenly sc all the way around your panel, making 2 sc in each of the 4 corners and at the widest point of the coffin in between the lace rows. Sl st to join to the first sc.
Rounds 2-3: Ch 1, sc blo around, sl st to join to the first sc.
Finishing
Step 1: Cut two pieces of scrap cardboard to fit the size of your panels. Cut two pieces of fabric 6.5 x 1.5 inches. Attach the fabric to the widest part of your cardboard cutouts using strong tape or hot glue so that it is visible behind the lace rows. Repeat for the other panel.

Step 2: To attach your crochet to your cardboard, and to add a cool metallic touch to your project, poke holes in your cardboard using your awl or pointy screwdriver. Poke from the crochet side to the cardboard side. Take your awl out of the hole, insert a brad, and open the wings of the brad on the cardboard side to secure. Repeat around – I spaced my brads about 1 ¾ inches apart from each other. There are 3 across the top, two on the bottom corners, and 4 on each side. Repeat for the other panel.

Step 3: Sew your zipper onto the side of one panel, then sew it onto the side of the other panel. So now your two panels are connected on the one side. Then use your embroidery needle to attach the other 3 sides of the two panels together. I recommend using the mattress stitch: go in and out of one panel, then in and out of the other panel, and repeat!


Step 4: Fold the rest of your fabric in half, lay your bag down so that one long side is in line with the folded edge of the fabric. Trace around the other sides of your bag – adding about ½ inch, so that your tracing is a bit larger than the actual bag. Following the lines you traced, cut through both layers of fabric. You should now have two equal size pieces that are connected on the one side because of the fold.
Step 5: Mark the length of your zipper on the side of the fabric opposite the fold. Sew your two pieces of fabric together along all of the sides, except for the section that you marked. Sew one side of the marked section just inside the zipper, and repeat on the other side. So now you have a fully enclosed pouch that is connected to your bag. Just tuck that pouch inside your bag, and you’re done with the lining!


Step 6: For the wristlet strap – make a 10” length of crochet icord, fold it in half and use the yarn tails to attach it to your lobster clasp. Clip the lobster clasp onto the zipper pull. Here’s how to crochet an icord:
Step 1: Ch 2
Step 2: Insert your hook into the 2nd ch from the hook, yarn over and pull up a loop.
Step 3: Ch 1 with the 2nd loop.
Step 4: Remove your hook from the 2nd loop.
Step 5: Ch 1 with the 1st loop.
Step 6: Reinsert your hook into the 2nd loop.
Repeat steps 3-6 until you reach the desired length.
Optional Embellishments – Heart & Wings

I got the free heart pattern from Sarah Maker
And the free bat wings pattern from Jen Hayes Creations
Related Patterns
Click below for more Halloween inspired makes!
Mini Witch Hat Advent Calendar
Sally’s Patchwork Pumpkin Amigurumi
_________________________
Please do not redistribute this pattern as your own, but feel free to sell finished items made from this pattern as long as you credit Nine Inspired as the designer. I would love to see your work on social media! Tag me @nineinspired